Quick Look @ Vue.js Part V - Adding Routing
Brett M. Nelson - Monday, March 13, 2017
Previously we have created a Vue.js App, added some content, made a component or two and separated our code. But what about routing?
Include Routing
Since we are just playing around we can include routing by adding a reference to the CDN. So lets add the following after our vue.js script tag:
vue-router.js CDN
Create Routes
In out app.js lets add an array called routes. This will be a collection of objects that have a path and a component. The path will be what the url path that is entered after the hashmark (#). Since we have 2 components already lets create 2 routes, a default route / that shows the task-list component, and a /newtask route to show the new-task component.
routes array in app.js
var routes = [ { path: '/', component: taskList }, { path: '/newtask', component: newTask } ]
If you are using lite-server or some other server that does changes detection and reloads you page you may notice you now have an error.
taskList is not defined

This is because we registered our components with Vue but we didn't assign the component to a variable so it's not currently defined for use outside of Vue. To fix this lets assign the result of creating our task-list component to a variable named taskList in app/task-list.js on line 1
Update app/task-list.js
var taskList = Vue.component('task-list', { //everything else remains the same for now })
And while we are at it let's do the same to app/new-task.js
Update app/new-task.js
var newTask = Vue.component('new-task', { //everything else remains the same for now })
Create and Register Router
Now that we have a couple routes defined lets create the router.
Back in app.js lets add a variable called router and assign the results of new VueRouter that we provide the routes to.
Create router
var router = new VueRouter({routes})
This router object will need to be passed into our app. So in the object we pass to Vue when we create the app lets add a property names router and for the value use the router object we just created.
Our entire app.js should now look like this:
Complete app.js
var routes = [ { path: '/', component: taskList }, { path: '/newtask', component: newTask } ]
var router = new VueRouter({routes})
var app = new Vue({ router: router, el: '#app', data: { message: 'Hello WIPDeveloper.com!', tasks: tasks } })
I've thought about moving the route stuff out of
app.jsbut decided against it for now. If there gets to be more going on I would move all the route specific things to aroutes.jsfile to keep things a little neater.
Fix the Views
Now we should be ready to start using the router. Lets remove our components from the index.html and in there place put a <router-view></router-view>.
Our completed index.html should now look like this:
Complete index.html
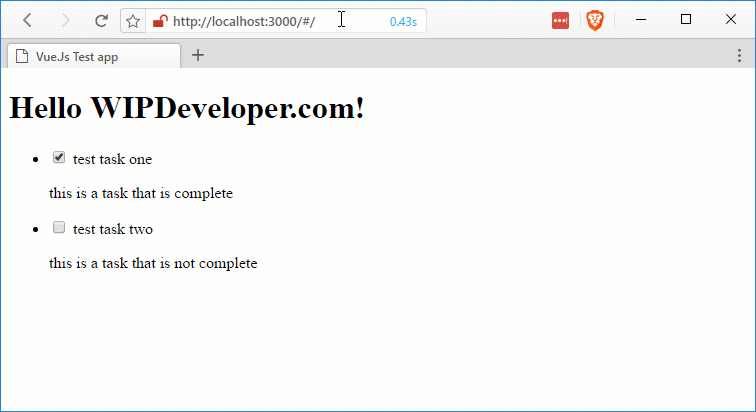
Now if you look in the browser you should see the header we put in the page but the tasks will be missing.
working but not showing any tasks
This is because we were binding the tasks to the view by passing them in through the markup. Since we removed the markup we can no longer configure this binding.
Let's fix this by updating the components to use the data property instead of the props property.
Components Use data Too
In our app/task-list.js lets remove the props property and add a data property. The data property is going to be a function that returns and object. In this case it's going to return an object that contains our tasks.
Here is what our complete app/task-list.js data property should look like:
app/task-list.js data property
data: function () { return {tasks}
We will also need to update our app/new-task.js in a similar manner by removing the props and adding tasks to the object returned by the data function.
Actually Navigate
Now things are looking like they are working and if you go to /#/newtask from the address bar you should be able to see the new task component and add one. Unfortunetly to see the new task you have to manually navigate back to the the root path /#/.
Adding Tasks
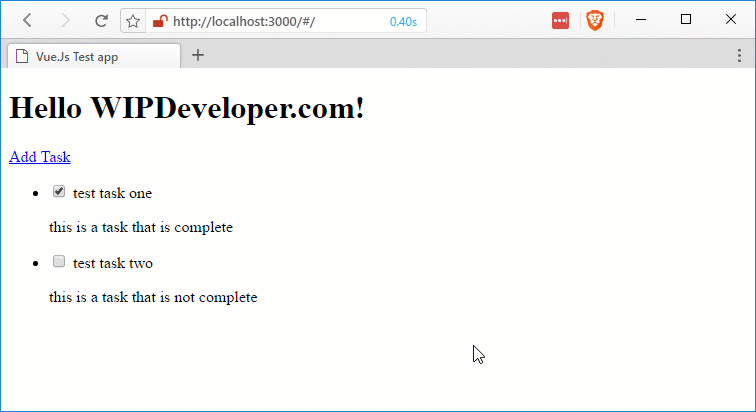
Lets start by adding a link to go from the task-list to the new-task. In app/task-list.js add <router-link to="/newtask">Add Task</router-link> on the line before the <ul>.
Complete app/task-list.js
var taskList = Vue.component('task-list', { template: `
-
\`, data: function () { return {tasks} } })
</p> </div> </li> </ul>Now we can navigate to the
new-taskwithout using thenavbar.In our
app/new-task.jslets addrouter.push('/')as the last line of ouraddTaskmethod.This will navigate to the root of the single page app without the user having to click a link.
Complete `app/new-task.js
var newTask = Vue.component('new-task', { template: `
\`, data: () => { return { title: '', description: '' tasks: tasks } }, methods: { addTask: function () { this.tasks.push({'title': this.title, 'description': this.description}) this.title = '' this.description = '' router.push('/') } } })With that we should be done for now.
Complete App in Action!
Code
Code can be found at Github/BrettMN/quick-look
How About That Vue?
We now have a simple ToDo app that lets us add tasks and navigate without using the nav bar. Of course we could probably do with a few more features like accepting the enter key to create a task. What do you think? Let me know by leaving a comment below or emailing brett@wipdeveloper.com.