Setting Up Babel CLI
Brett M. Nelson - Wednesday, October 19, 2016
Writing JavaScript with syntax defined in the ECMAScript 6 (ES6), ECMAScript 2016(ES2016) and eventually ECMAScript 2017 (and so on and so forth) to be used in currently browsers can require a little more work that just including a <script /> tag. While it may be possible to use features that are already implemented in some browsers there is no guarantee your users are going to use the most up-to-date browser. To get around this we will need to use a transpiler.
If you know you can force your users to using a certain browser you can see what you "get away with" (read: use) with this handy-dandy compatibility chart. You can also use ES6 features without a transpiler if you plan on using Node v6 (or later)
Today we will set up Babel.
Before starting I ran npm init on an empty diretory so I would have a
package.jsonstarted.
Setup
We will setup Babel using it's provided cli tool. It is recommended to install it locally so we will begin with opening a command prompt to our working directory and running npm init so that npm walks us through the setup of out package.json
npm init
D:WorkspaceDreamforce-2016-Introduction-to-ECMAScript-66-babel>npm init
This utility will walk you through creating a package.json file.
It only covers the most common items, and tries to guess sensible defaults.

See `npm help json` for definitive documentation on these fields
and exactly what they do.

Use `npm install <pkg> --save` afterwards to install a package and
save it as a dependency in the package.json file.

Press ^C at any time to quit.
name: (06-babel)

version: (1.0.0)
description: babel-cli setup example
entry point: (index.js)
test command:
git repository:
keywords:
author: BrettMN<brett@wipdeveloper.com>
license: (ISC) MIT
About to write to D:WorkspaceDreamforce-2016-Introduction-to-ECMAScript-66-babelpackage.json:

{
  "name": "06-babel",
  "version": "1.0.0",
  "description": "babel-cli setup example",
  "main": "index.js",
  "scripts": {
    "test": "echo "Error: no test specified" && exit 1"
  },
  "author": "BrettMN <brett@wipdeveloper.com> (https://www.WIPDeveloper.com)",
  "license": "MIT"
}


Is this ok? (yes)
Looking through that you may notice a
label:(suggestion)and ananswer. So inname: (Babel) babel-cli-setup,name:is the label,(Babel)was the suggestion andbabel-cli-setupwas my answer. If you want to use the suggestion all you have to do is press enter.
In case you are wondering, the answers I provided were:
- 06-babel
- 1.0.0
- babel-cli setup example
- index.js
- nothing
- nothing
- nothing
- BrettMN brett@wipdeveloper.com (https://www.WIPDeveloper.com)
- MIT
- yes
This will result in a package.json file in the working directlory that looks likethe following:
package.json
{
  "name": "06-babel",
  "version": "1.0.0",
  "description": "babel-cli setup example",
  "main": "index.js",
  "scripts": {
    "test": "echo "Error: no test specified" && exit 1"
  },
  "author": "BrettMN <brett@wipdeveloper.com> (https://www.WIPDeveloper.com)",
  "license": "MIT"
}
Now we can install the Babel cli locally with the npm install --save-dev babel-cli command:
npm install --save-dev babel-cli
D:WorkspaceDreamforce-2016-Introduction-to-ECMAScript-66-babel>npm install --save-dev babel-cli
06-babel@1.0.0 D:WorkspaceDreamforce-2016-Introduction-to-ECMAScript-66-babel
`-- babel-cli@6.16.0
  +-- babel-core@6.17.0
#### lines removed to make it a little less verbose ####
  `-- v8flags@2.0.11
    `-- user-home@1.1.1

npm WARN optional Skipping failed optional dependency /chokidar/fsevents:
npm WARN notsup Not compatible with your operating system or architecture: fsevents@1.0.14
npm WARN 06-babel@1.0.0 No repository field.

D:WorkspaceDreamforce-2016-Introduction-to-ECMAScript-66-babel>
Now if you look in your package.json it should have added a deveDependencies property:
package.json Updated
{
  "name": "06-babel",
  "version": "1.0.0",
  "description": "babel-cli setup example",
  "main": "index.js",
  "scripts": {
    "test": "echo "Error: no test specified" && exit 1"
  },
  "author": "BrettMN <brett@wipdeveloper.com> (https://www.WIPDeveloper.com)",
  "license": "MIT",
  "devDependencies": {
    "babel-cli": "^6.16.0"
  }
}
Now we will add a new line to our package.json in the scripts section. Bellow the "test" add the following line:
"build": "babel src -d lib"
Our updated-updated package.json should now look like the following:
package.json Updated-Updated
{
  "name": "06-babel",
  "version": "1.0.0",
  "description": "babel-cli setup example",
  "main": "index.js",
  "scripts": {
    "test": "echo "Error: no test specified" && exit 1",
    "build": "babel src -d lib"
  },
  "author": "BrettMN <brett@wipdeveloper.com> (https://www.WIPDeveloper.com)",
  "license": "MIT",
  "devDependencies": {
    "babel-cli": "^6.16.0"
  }
}
Now we can create a JavaScript file in a src folder and write in an ES6 style and then type npm run build on the command line of out root working directory and it will transpile our code.
So we create a file in src named test.js that contains the following:
src/test.js
var whatIsCool = word => `${word} is cool!`;
and run npm run build and it becomes:
lib/test.js
var whatIsCool = word => `${ word } is cool!`;
Now that's not cool! Lets see how to correct this.
Basically at this point Babel is just taking your JavaScript and copying it to a new location.
Presets!
If you look at the Babel plugins page you'll see we need to add presets to compile to ES5.
Lets add the preset for es2015
npm install --save-dev babel-preset-es2015
Now out package.json should be updated again:
Updated-Updated-Updated package.json
{
  "name": "06-babel",
  "version": "1.0.0",
  "description": "babel-cli setup example",
  "main": "index.js",
  "scripts": {
    "test": "echo "Error: no test specified" && exit 1",
    "build": "babel src -d lib"
  },
  "author": "BrettMN <brett@wipdeveloper.com> (https://www.WIPDeveloper.com)",
  "license": "MIT",
  "devDependencies": {
    "babel-cli": "^6.16.0",
    "babel-preset-es2015": "^6.16.0"
  }
}
Now lets add a new file to the project directory and name it .babelrc. In this new file we will specify our preset:
.babelrc
{
  "presets": ["es2015"]
}
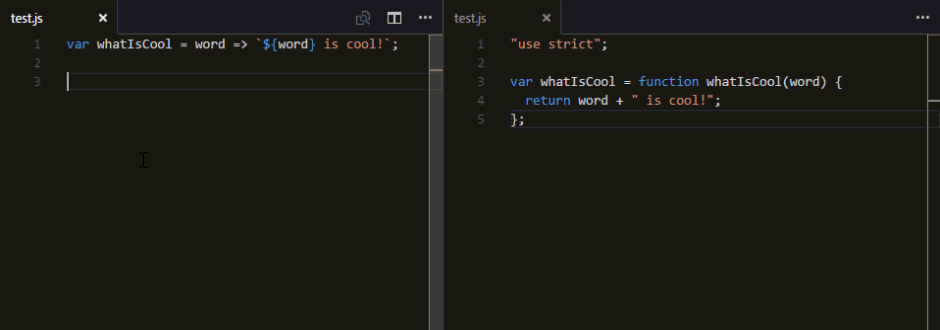
Now with the save src/test.js if we run npm run build it will create a ES5 compatible version of the same code:
lib/test.js
"use strict";

var whatIsCool = function whatIsCool(word) {
  return word + " is cool!";
};
Success!
That looks more like it! Now we can support all those people who want to use IE11 or an older version of Android.
But Wait, There's More!
So far we have been running the command every time we want to transpile the code but there has to be an easier way.
In our package.json lets add one more "scripts". Under the build we previously added add the following line:
"watch": "babel src -d lib --watch"
Our final package.json should look like the following:
Final package.json
{
  "name": "06-babel",
  "version": "1.0.0",
  "description": "babel-cli setup example",
  "main": "index.js",
  "scripts": {
    "test": "echo "Error: no test specified" && exit 1",
    "build": "babel src -d lib",
    "watch": "babel src -d lib --watch"
  },
  "author": "BrettMN <brett@wipdeveloper.com> (https://www.WIPDeveloper.com)",
  "license": "MIT",
  "devDependencies": {
    "babel-cli": "^6.16.0",
    "babel-preset-es2015": "^6.16.0"
  }
}
Now you can enter npm run watch on the command line and Babel will build your files once and then wait for more changes. When it detects changes it will rebuild your files.
Saving In Action
Now you can see the changes as soon as you hit save.
Now What?
Hey, you can now use the Babel cli to transpile your ES6 to ES5, just think of all those old android devices you can support. There is, of course, more to the Babel cli. If you would like to know more about it let me know by leaving a comment below or emailing brett@wipdeveloper.com.
The code used in this demo is available at GitHub.com/BrettMN/Dreamforce-2016-Introduction-to-ECMAScript-6/.