Using ForceJS with Vue.js - Part IV - Event Hub
Brett M. Nelson - Monday, March 20, 2017
Quick recap up to now we have done set up, queried Salesforce.com using ForceJS and ForceSever with Vue.js and created a service to make our calls to Salesforce.com more re-useable. Now let pass some data between 2 components using an even hub.
Please Pass the Event... Hub
We are going to create a new component and pass information from our contact component to our new component using a message buss. To make a message buss is pretty easy we will make a new instance of a Vue object and only use it to register event related actions.
In your services folder lets make a new file, I called mine eventHub.service.js but feel feel to call yours what ever suits your naming desires. In this new file create a new instance of Vue and give it a name you feel would suit a level 1 event hub, I called my instance eventHub.
app/services/eventHub.service.js
let eventHub = new Vue()
That's it. Your event hub is ready for use.
New Component has Entered the App
One thing we want to be able to do is select a contact and show the details for that contact. Sicne our contacts list is a component lets make a local component to our contacts component. First thing you will need to do is add a property for components to the contacts component. This new property will be a JSON object that is the name of the components and the object, or options, that defines the component. Lets call our new component contact-detail and give it an object named contactDetail.
app/components/contacts.js's New components Section
components: { 'contact-detail': contactDetail },
If you try the app now you will get an error because we haven't defined this new component yet, we'll add that in a moment but first lets add a button to Show Details in each contact that has a v-on:click that calls a method select. This means we need to add a select method to contacts
app/components/contacts.js's New select Method
select: (id) => { console.log(id) eventHub.$emit('selectedContact', id) }
The eventHub.$emit('selectedContact', id) in our select method will send a message to our event hub that other components can register to listen for. When they the event is sent they will also receive the id that is sent with it. Now lets create that contactDetail to listen for events
Create a new file in the component folder, I named mine contact-details.js and it will look something like this:
New app/components/contact-details.js
let contactDetail = { template: `
\`, data: () => { return { currentContact: { }, showContact: false } }, created: function () { eventHub.$on('selectedContact', this.loadContact) }, methods: { loadContact: function (id) { this.showContact = false this.currentContact = {} sfService.query(\`SELECT Id, Name, MobilePhone, Email, Title, Department, LeadSource, Level__c, Languages__c FROM Contact WHERE Id = '${id}'\`)
.then(response => {
this.currentContact = response.records\[0\]
this.showContact = true
})
}
} }
We have covered most of this before but we have a new section called created. This will be called when the components is created allowing us to register to listen to events on the eventHub. The eventHub.$on takes an event name and a method to call when it occurs. In this case it will call loadContact.
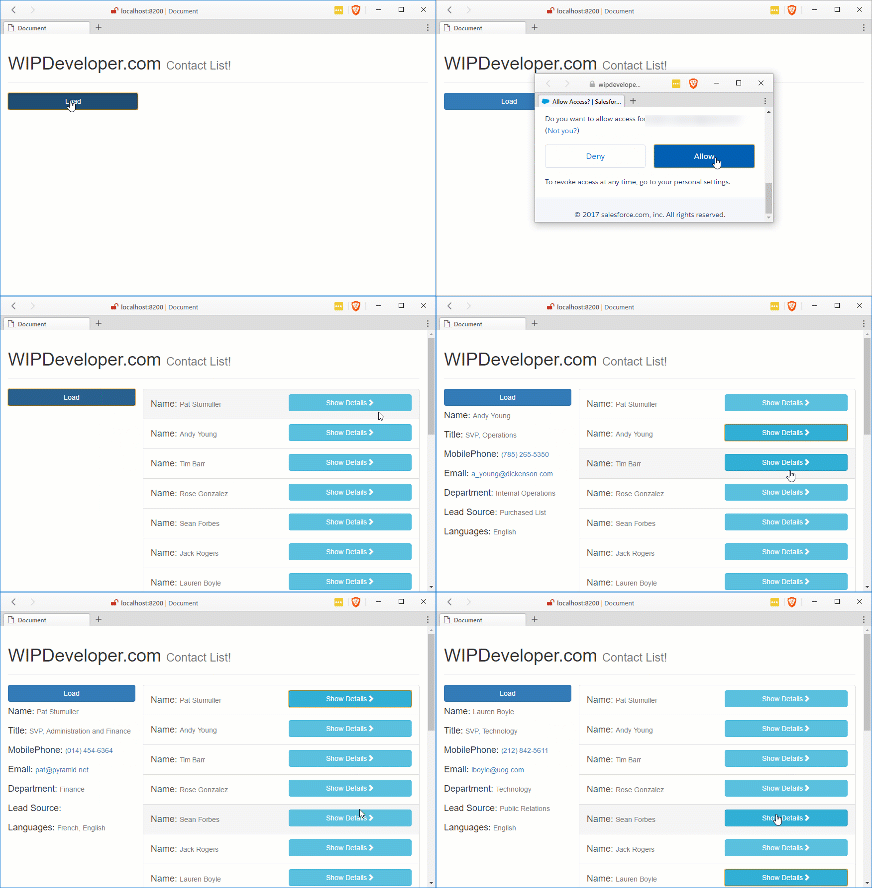
Let's see it in action:
Events In Action!

Conclusion
Now we can pass information between components and trigger events. What should we try next? Let me know by leaving a comment below or emailing [email protected].