Visualforce and Angular - Add Routing
Brett M. Nelson - Tuesday, May 9, 2017
Last time we styled our contact list with Bootstrap. Let's try adding a second component to show the details of a contact when we select one from the list.
Create New Component
First thing we will need is to create a new component. In the src-ng folder use either the ng g component or the ng generate component with a name for your new component, I going to call mine contact-details.
If you are wondering the
ng gis an alias forng generate. Basically same command, less typing.
It should look something like this in the terminal:
ng g component contact-details in Action
PS D:\Workspace\Blog\salesforce\personal-dev\src-ng> ng g component contact-details installing component create src\app\contact-details\contact-details.component.css create src\app\contact-details\contact-details.component.html create src\app\contact-details\contact-details.component.spec.ts create src\app\contact-details\contact-details.component.ts update src\app\app.module.ts
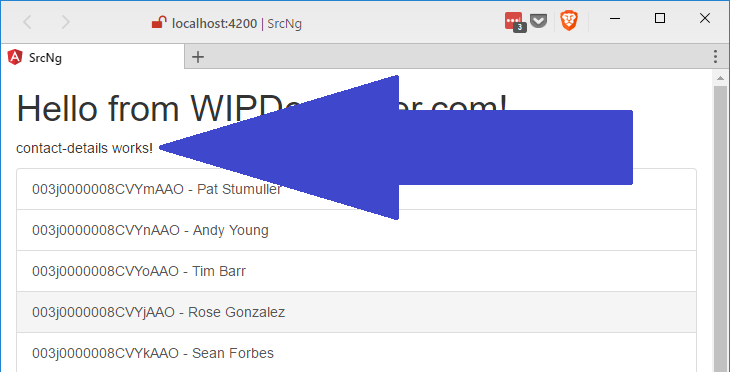
We could add this to out application by putting a tag for it in our app.component.html
Use contact-details Tag
Visualforce and Angular - Add Routing
Now you can see the contact-details works!
contact-details works!

Doing this isn't really useful though and we are going to add Routing, so maybe we should do that now.
Add Routing
In the app.module.ts we are going to add an import for RouterModule, and Routes from the @angular/router. We will then define a routes object that is of type Routes. The routes object will be an array of objects that have a path and a component. The route for out Contact Details component will have a url parameter for id, it will have the colon.
Import RouterModule, and Routes and set up routes
import { RouterModule, Routes } from '@angular/router';
const routes :Routes=[ { path: '', component: ContactsComponent }, { path: 'contact-detail/:id', component : ContactDetailsComponent } ]
If you were paying attention you may have noticed we didn't use the RouterModule yet. That will be used in our @NgModules imports array to set the routes for the root module.
Updated @NgModule of app.module.ts
@NgModule({ declarations: [ AppComponent, ContactsComponent, ContactDetailsComponent ], imports: [ BrowserModule, FormsModule, HttpModule, RouterModule.forRoot(routes) // <== Here it is ], providers: [ RemoteActionsService ], bootstrap: [AppComponent] }) export class AppModule { }
In case you are wondering there is a RouterModule.forChild when you are setting the route on a child module.
Now we need to update our view though.
Open your app.component.html and replace the <app-contact-details></app-contact-details> and <app-contacts></app-contacts> with <router-outlet></router-outlet>. It should end up looking similar to this:
Updated app.component.html
Visualforce and Angular - Add Routing
We could manually navigate between the 2 routes we set up but since I'm a little lazy we are going to update our contacts.component.html instead.
Router Links
In contacts.component.html we had set up a list-group that was a tags. Let's add routerLink="/contact-details/" to those a tags. This actually gives us an error since we defined our route to have an :id and we did not provide one.
Router Error
ERROR Error: Uncaught (in promise): Error: Cannot match any routes. URL Segment: 'contact-details' Error: Cannot match any routes. URL Segment: 'contact-details'
To fix this and pass in the id for the contact we are currently on we will use Angular's Property binding.
Property binding in Angular is applied by the use of square brackets (
[]) around the name of the property of the html element. It is sometimes referred to as "One Way" data binding as it only allows data to move from the logic to the view.
When Property binding to routerLink we will pass in an array of objects. The first object will be the path as a string and the remaining items will be the required and optional parameters. In our case we will have an array with 2 items: the route path, and the id. It should look like this:
Property binding the routerLink
[routerLink]="['/contact-details', c.Id]"
The whole anchor tag should look like this:
Updated Anchor Tag
<a *ngFor="let c of contacts" [routerLink]="['/contact-details', c.Id]" class="list-group-item"> -
Now when we select a contact from our list the url should update to something similar to this http://localhost:4200/contact-details/003j0000008CVYpAAO with the correct id for the contact you selected.
YAY Routing!

Conclusion
We now have some routing set up. How about next time we load the contact details when we go to the contact details page, sound like a plan? Let me know by leaving a comment below or emailing [email protected].