Visualforce and Angular - Component Re-Use
Brett M. Nelson - Thursday, May 25, 2017
I mentioned the benefit of re-usability when we started creating our input-text.component but we really haven't see it in play yet. Let's see a couple ways to make use of it.
Display Only
We have some items right now that are display only, even when editing. This doesn't mean we can't use our input-text.component to help maintain a consistent look and feel for our display elements. For now, on the contact-details.component.html, let's remove all that mark up we have to display the id:
Old id Display Markup
and replace it with our custom component without the Property binding to editing:
New id Display Markup
<app-input-text [(textValue)]="id" [label]="'Id'">
It looks and behaves the same since input-text.component's editing is never set to true it does not allow the user to edit it.
We could do this with the name since it's an aggregate field and can not be edited directly but I would rather update our Apex class TryAngularControllers GetContact and UpdateContact to work with first and last names
Update Apex TryAngularController Class
In TryAngularController class change GetContact to get the FirstName and LastName instead of Name
Updated GetContact
@RemoteAction
public static Contact GetContact(String contactId){
Contact contact = [SELECT Id, FirstName, LastName, Email FROM Contact WHERE Id =: contactId];
return contact;
}
Then update the UpdateContact to have parameters for firstName and lastName and set those values before updating the contact.
Updated UpdateContact
@RemoteAction public static void UpdateContact(String contactId, String firstName, String lastName, String email){ Contact contact = [SELECT Id FROM Contact WHERE Id =: contactId];
contact.FirstName = firstName;
contact.LastName = lastName;
contact.Email = email;

update contact;
}
Since we are changing how the contact behaves we should also update our contact.ts to have a FirstName and LastName properties that are both strings.
Updated GetContact
export class Contact{ constructor(){} Id:string; Name:string; Email:string; FirstName:string; LastName:string; }
We are going to keep the Name for now as it is less work to get the display name for use in our list of contacts than to recreate the display name with the first and last name we could get.
Add More Fields to Edit
Back in our contact-details.component.html, let's remove the mark up for the name
Old name Display Markup
and add 2 components to edit the firstName and the lastName
New id Display Markup
<app-input-text [(textValue)]="firstName" [label]="'First Name'" [editing]="editing"> <app-input-text [(textValue)]="lastName" [label]="'Last Name'" [editing]="editing">
This is a lot less markup to add some a field to edit to our form. We went from each input being 4 lines to 1 display only and 3 display and edits being 4 lines.
Now let's update the onSubmit of contact-details.component.ts to set the firstName and lastName before calling service.updateContact
Updated contact-details.component.ts's onSubmit
onSubmit() {
this.editing = false;
this.originalContact.FirstName = this.firstName; this.originalContact.LastName = this.lastName; this.originalContact.Email = this.email;
this.service.updateContact(this.originalContact) .then(results => {
  this.ngOnInit()
});
}
All we need to do now is update remote-actions.service.ts's updateContact to pass in the contact.FirstName, and contact.LastName and then we can see it in action.
Updated remote-actions.service.ts's updateContact
updateContact(contact: Contact): Promise<{}> { console.log('getContact called');
return new Promise((resolve, reject) => {
  this.callRemote('TryAngularController.UpdateContact', \[contact.Id, contact.FirstName, contact.LastName, contact.Email\], resolve, reject);
})
}
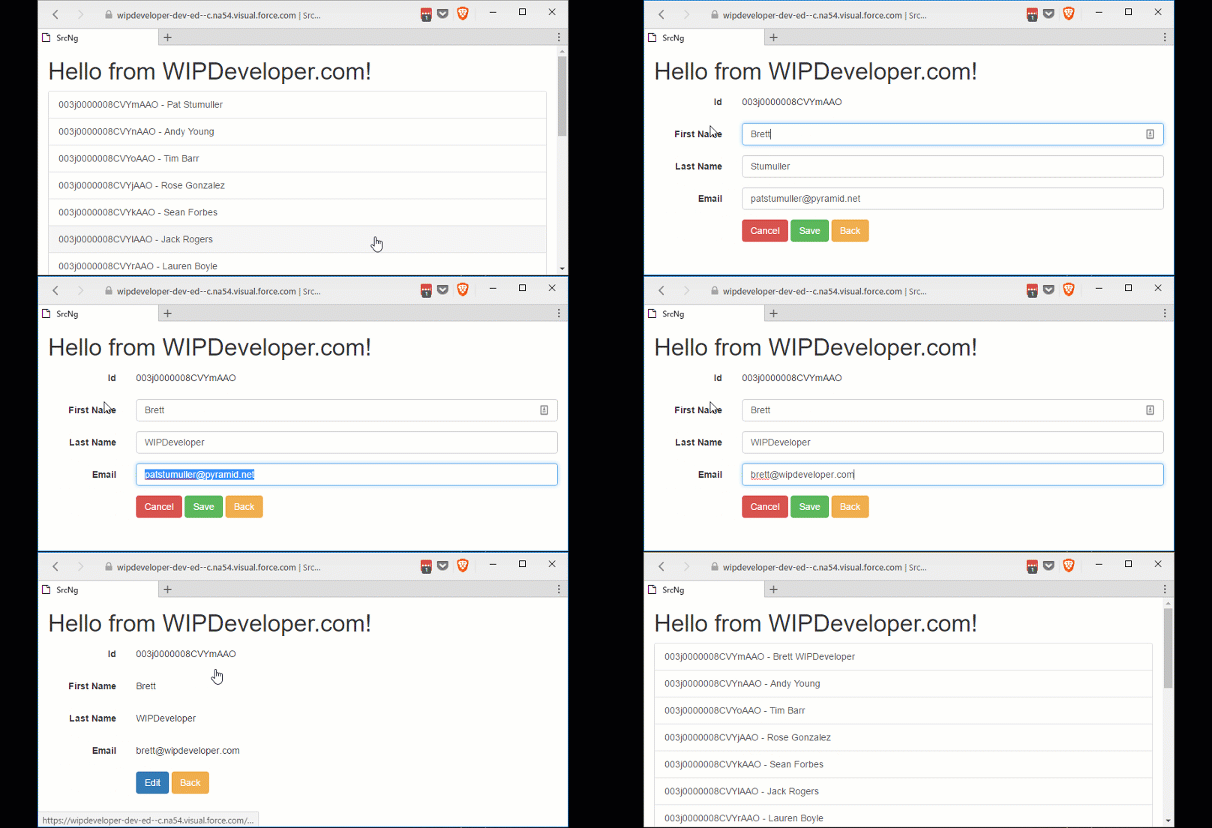
And Action!

Conclusion
We now have a custom component that can be used in multiple places. This allows us to worry less about if we copied and pasted the Bootstrap example properly each time and focus on delivery value to the project. What do you think we should look at next? Let me know by leaving a comment below or emailing [email protected].