Visualforce and Angular - Setting Up Angular
Brett M. Nelson - Monday, April 24, 2017
Last time we did most of the setup for our Salesforce.com things so now lets get a basic Angular app set up.
Get the CLI
We will be using the Angular CLI so the first thing you need to do in install it. You can either install it if you haven't installed it before:
Install Angular CLI
npm install -g @angular/cli@latest
Or you can uninstall it, clear your npm cache, and install it again :)
Reinstall Angular CLI
npm uninstall -g angular-cli @angular/cli npm cache clean npm install -g @angular/cli@latest
Armed with the cli you can now create an Angular project.
Create an Angular Project
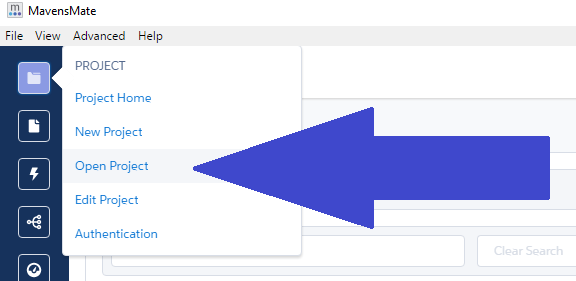
Open a command line or terminal or your favorite shell in the root of your Salesforce Project. If you don't know where this is, in Mavensmate it is displayed on the "Select Project" menu. Get there by going to Project then Open Project.
Project => Open Project
Select Project
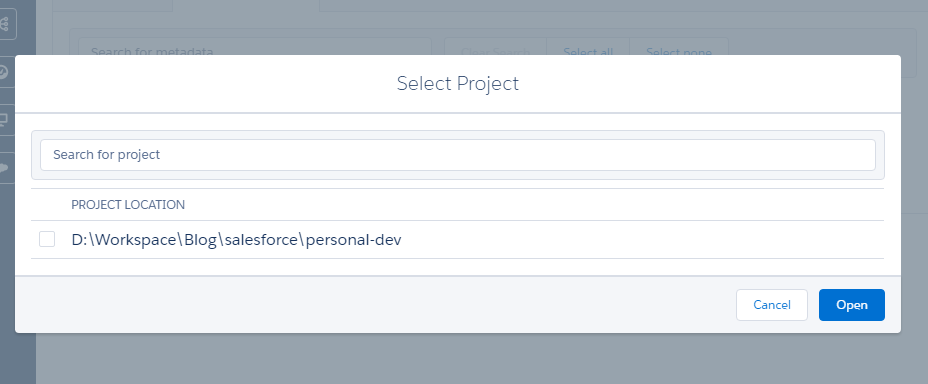
Note: This is also the first menu you see when first opening Mavensmate.
Note 2: You can also get here if you are using Visual Studio Code by right clicking a file or folder in root and choosing copy path. And then open your command line and use
cdand past the path just remembering to remove the the file or folder you clicked on from the path.
Now that you are in the proper place if your terminal we will create our Angular Project. I'm going to call my project src-ng but you may choose something different.
Create New Angular Project
ng new src-ng
This should so you a list of what is being created and look something like this once it is done:
ng new src-ng Output
PS D:\Workspace\Blog\salesforce\personal-dev> ng new src-ng installing ng create .editorconfig create README.md create src\app\app.component.css create src\app\app.component.html create src\app\app.component.spec.ts create src\app\app.component.ts create src\app\app.module.ts create src\assets\.gitkeep create src\environments\environment.prod.ts create src\environments\environment.ts create src\favicon.ico create src\index.html create src\main.ts create src\polyfills.ts create src\styles.css create src\test.ts create src\tsconfig.app.json create src\tsconfig.spec.json create src\typings.d.ts create .angular-cli.json create e2e\app.e2e-spec.ts create e2e\app.po.ts create e2e\tsconfig.e2e.json create .gitignore create karma.conf.js create package.json create protractor.conf.js create tsconfig.json create tslint.json Successfully initialized git. Installing packages for tooling via yarn. Installed packages for tooling via yarn. Project 'src-ng' successfully created. PS D:\Workspace\Blog\salesforce\personal-dev>
I have Yarn installed on my computer so Angular makes use of that automagically.
Lets try running it and see what happens.
Run Angular
Go into the directory that was just created
Change Directory
cd src-ng
And start the Angular app
Start the Angular App
ng serve
It should have some output:
ng serve Output
PS D:\Workspace\Blog\salesforce\personal-dev\src-ng> ng serve ** NG Live Development Server is running on http://localhost:4200 ** Hash: 29d45a42885670da5809 Time: 8111ms chunk {0} polyfills.bundle.js, polyfills.bundle.js.map (polyfills) 165 kB {4} [initial] [rendered] chunk {1} main.bundle.js, main.bundle.js.map (main) 3.69 kB {3} [initial] [rendered] chunk {2} styles.bundle.js, styles.bundle.js.map (styles) 9.77 kB {4} [initial] [rendered] chunk {3} vendor.bundle.js, vendor.bundle.js.map (vendor) 2.39 MB [initial] [rendered] chunk {4} inline.bundle.js, inline.bundle.js.map (inline) 0 bytes [entry] [rendered] webpack: Compiled successfully.
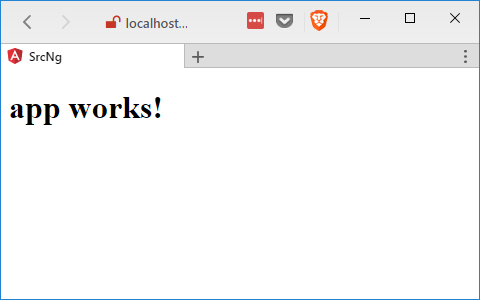
You see on the first like where it says ** NG Live Development Server is running on http://localhost:4200 ** that means you can now open a web browser to http://localhost:4200 and see your brand new Angular app!
Angular App Live!
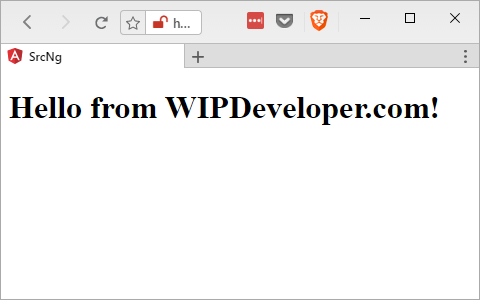
Lets change something to make sure it's working properly.
In your editor go to the src-ng/src/app/app.component.ts and change line 9 from app works to something else:
Updated src-ng/src/app/app.component.ts
import { Component } from '@angular/core';
@Component({ selector: 'app-root', templateUrl: './app.component.html', styleUrls: ['./app.component.css'] }) export class AppComponent { title = 'Hello from WIPDeveloper.com!'; }
It should auto reload the page in the web browser, if you left it open, so you can see you changes right away!
Update Angular App!
Conclusion
Now we have an Angular app setup we are ready to get it working on a Visualforce page. Are you having fun yet? Let me know by leaving a comment below or emailing brett@wipdeveloper.com.